Pages

Wednesday, December 29, 2010

Tissue Box Cover


The base of the box is 4 1/2" square to fit a standard tissue box. The top uses oval nestabilities for a clean, sharp cut. I sponged all edges with chocolate chip ink. I had to use the larger size folder for the dry embossing folder because the normal size did not cover the entire paper. The polka dot punches stamp is punched with the scallop punch.


Sunday, December 19, 2010

With Heartfelt Sympathy


I love this design. I punched four squares each of two different sizes, then used the corner rounder punch. The Heartfelt Sympathy stamp was a clear stamp. I cut it into two stamps for a different look.

Christmas: Blue Jay


The Stampin' Up bird punch is quite versatile. Here in Montana, we have blue jays in the winter, so I decided to make our winter bird. I punched the bird and two wings, sponged all around, used one wing for the bird's head, and mounted all pieces on dimensionals. I used two of the branches in green. The branches was taped down, but the leaves were left 3D.

Saturday, December 18, 2010

Two Christmas Cards


Both cards used white and red card stock. The tree is dry embossed with Cuttlebug's folder. The be merry stamp is one of my favorite stamps. On the tree card, I punched the sentiment and the scallop out. On the snowflake card, I stamped directly onto the card. Certainly is a different look from the same stamp.

Monday, December 13, 2010

Christmas: Ornament with Swirls


I used Stampin' Up's ornament stamp set and matching punch in the rich Bermuda Bay color scheme. Putting the ornament on dimensionals and adding bling finished the card.

My challenge is to make one Christmas card each week. My daughter says at this rate, I will have 365 cards by next Christmas. I just can't help myself!

Sunday, December 12, 2010

Christmas: White Wreath


This is card 3 of my Christmas Challenge. I used the Cuttlebug embossing folder for the wreath. I colored the center of the poinsettias yellow, put pearls in the center of the snowflakes, added red bling in the corners, and stamped a simple Merry Christmas. I love the white on white!

Saturday, December 11, 2010

Christmas: Punched Wreath


The wreath is made from punched flowers. The base was also punched from the scallop punch and the 1 1/4' circle. Each punched flower was cut in half and attached to the base. Even though it was quite time consuming, the end result is worth it. I would not make 25 of these, however!

Thursday, December 9, 2010

Christmas: Dasher


My Christmas challenge for myself is to make one Christmas card per week. That way, when next year rolls around, I will have 50 or so cards. This is number one.

My recipe:
Certainly Celery, white card stock
Dasher stamp
Joy stamp from Stampin' Up's Small Script set
Simple Snowflake stamp from Stampin' Up, XL Snowflake punch
Embossing folder Houndstooth from Cuttlebug
Sponging with dark green and certainly celery inks
bling
dimensionals

Sunday, December 5, 2010

Christmas: Card to Santa


My grandson is sending this card to Santa with his letter inside. This is as simple as it gets. I stamped the Santa, colored with my water colorer in red and green, stamped the sentiment, and gave it to Patrick to write the message.

Thursday, December 2, 2010

Thank you for the Baby Shower


We made the cards 3 1/2" by 3 1/2" to fit into our envelopes. Looking for a CAS card, we stamped the thank you, punched it with the word window, and attached it to the punched label. Next, the ribbon was tied. The inside of the card has a stamped "Baby" and plenty of room for Aaron to write.

Monday, November 29, 2010

Star Tree Topper


I used Sizzix's 3D pop up ball to make this tree topper. I used 5 of the 6 sides, leaving one side open to slip onto the tree. I did not use the pieces that use the rubber band; I only used the hexagons and the trapezoidal scored pieces. I alternated red and green card stock for the star. I stamped each of the star pieces front and back, but my grandson Patrick wanted glitter, so the stamped images aren't as noticeable as the glitter. As it should be. The center of the star is Patrick. My daughter Aaron - and Patrick's mother - thought of this design. Clever girl!

Friday, November 26, 2010

Gift Tags


The gift tags were cut from Sizzix Bigz Two Tags. The die cuts and scores the larger tag, but not the smaller tag. So, I used my slit punch and scored the smaller tags myself. I used stamps out of many of my sets. I made birthday and Christmas tags. What a fun project!

Thursday, November 25, 2010

More Tea Lights!


I love the tea lights! These are favors for Aaron's baby shower this week.

Friday, November 19, 2010

Stamped Tea Lights for Thanksgiving


I saw this cute idea and just had to make my own tea lights. I put 4 layers of tissue paper sandwiched between 2 layers of copy/typing paper. I punched through all 6 layers with a 1 3/8" circle punch. While still sandwiched, I put a center hole through all 6 layers. Then I stamped the tissue paper. I put the tissue paper on top of the tea light, putting the wick through the center hole. Then, using my heat tool, I heated the tea light until the tissue paper melted into the wax. I put some glitter on while the wax was still hot. That is all.


This project was so quick, I completed 8 tea lights in 40 minutes. Including putting it on a punched scalloped circle with the punched greeting.

Thursday, November 18, 2010

Petal Punch Box for Baby Shower

I am still making prizes for the baby shower. The idea for this petal punch box I found on Frenchie's blog. First I punched four of the petals and folded the score lines. I cut off one of the four petals.


Then, I put red sticky tape on the side opposite of the cut petal. I stamped the square with a stamp from the Paper Studio's Baby Barrel of Stamps.


I attached the sides, putting the red sticky tape under the cut edge.


Then, I folded the last sticky tape onto the last cut edge, making the box. I folded the bottom, tucking in the last petal. Notice the Reese's peanut butter cup is just the right size...


Then I closed the top like the bottom. I haven't decided if I am done. Or maybe put a ribbon around it. Or put a flower or heart on it.

Sunday, November 14, 2010

Desk Organizer: Sticky Notes and Business Cards


This desk organizer has a sticky-note pad and a small pencil in the front and business cards in the back. The two boxes were made separately and adhered to the decorated piece in the center with sticky tape. A fun and easy project!

Christmas: Patterned Pines


I used Certainly Celery card stock and ink. The color was lighter than I envisioned, so I had a difficult time with the layout. I had too much white on the card at first, which was way too light for Certainly Celery. I think this was a nice mixture of color and white. The bling on the top of the tree is a small crystal. It showed up different in the picture.

Christmas: 'Twas The Night Before Christmas


I love wordle.com to create an unusual card front. For this card, I copied and pasted the poem 'Twas the Night Before Christmas into wordle's text box. I chose the colors, font, and layout. I printed the wordle. Can not get any easier. I added some bling in the corner and printed the poem for the inside of the card.

Sunday, November 7, 2010

Christmas: Joy to the World


My son Jason was married in July, 2010. For the Christmas card to my family members, I ordered prints of three of my favorite pictures. I cut the pictures, matted them with black, and put the pictures on the red card. Their colors were red and black.

The fronts of the cards were made with white embossed cardstock. Cuttlebug has two similar Christmas embossing folders. On one there is swirls and snowflakes; it embossed the paper crisply and cleanly. The other has snowflakes only; it was not as crisp as the other folder. You can really tell in the picture -- one card is clearly embossed and the other card is not.

On the inside of the card, I did not add anything but the pictures. This way, the recipients of the card can set it on a flat surface and use it as a frame. Or put it in a frame on the wall.


Altered Clipboards


My daughter and I made twelve altered clipboard for prizes at her baby shower. Each one has a coordinating paper on the back. Boy, what fun we had picking out the paper! This was a challenging project; when we added the Modge Podge to the paper, the paper puckered and bubbled. We used the brayer to flatten it, but it seemed like a losing battle. However, when the Modge Podge dried, the bubbles and wrinkles were gone!

Thank You Mini Milk Carton


At the MEA-MFT Educators Conference, I had thank-you gifts to make for those that presented sectionals for MAACE. I used a fall color theme for the mini-milk cartons; the sentiment is stamped on orange vellum. I used both Enjoy Your Day and Thanks So Much for the sentiment. I love my Tiny Tags stamp set and punch. It adds a cute element to the project. My presenters were quite surprised and pleased with the gift.

Sunday, October 31, 2010

Baby Shower Invitations


My daughter Aaron and I made invitations to her baby shower. We used Whimsical Words from Stampin' Up for the sentiment. The four other stamps were Barrel of Stamps from the Paper Studio bought at Hobby Lobby. We had a difficult time finding stamps that worked for what we had in mind. In fact, we spent as long planning and deciding what to do as making all of the invitations.

The three stamped images were punched with a 1" square, then attached to the blue scalloped square. The hand brad was added to the middle square; the rattle was added to the bottom corner. Only the middle scalloped square was put on dimensionals. The envelope and the back of the card had Stampin' Up's Itsy Bitsy Baby stamp. We sponged around the card with dark blue ink. The inside of the card had the specific information for the shower; this was printed on the computer.

Sunday, October 17, 2010

Birthday: Aged To Perfection


Another masculine card. I used Stampin' Up's tree on cream card stock, then ran it through the Cuttlebug embossing folder. Then I used my water brush to spread the brown, orange, and yellow inks on the tree. I stamped and punched the Aged to Perfection, followed by a scallop layer. Then I sponged the edges of the card with the brown ink.

Saturday, October 16, 2010

Birthday: Trees in Scalloped Squares


This card was clean and simple, using dark brown and cream card stocks, three tree stamps, a happy birthday stamp, two square punches, a scalloped square punch, and a corner punch. I sponged the outside edge with the same dark brown ink to add dimension. A masculine card is getting easier for me, and often faster, too.

Sunday, October 10, 2010

25 Christmas Cards - A Donation for the Montana Professional Teaching Foundation

Each year at the MEA-MFT Educator's Conference, there is an auction for the Montana Professional Teaching Foundation. My daughter Aaron and I made twenty-five cards, 5 each of 5 different layouts. I put them in 5 packets, with one of each layout in the packet.

The cardinal on a branch uses Cuttlebug's embossing folder. I punched the white snowflakes and put a red jewel in the center.

The brayered tree scene used a post-it note for the moon and a cut away for the snow. I used bashful blue with the brayer. A Merry Christmas stamp finished the front.


The hanging ornaments used Cuttlebug's embossing folder. Bling was added to each ornament. The poinsettia corner stamp filled up the white space to complete the front.

I used Stampin' Up's Jingle All The Way for the sentiment. I layered the white on red, using the ticket punch and white brads for embellishment. A red ribbon finished the front.


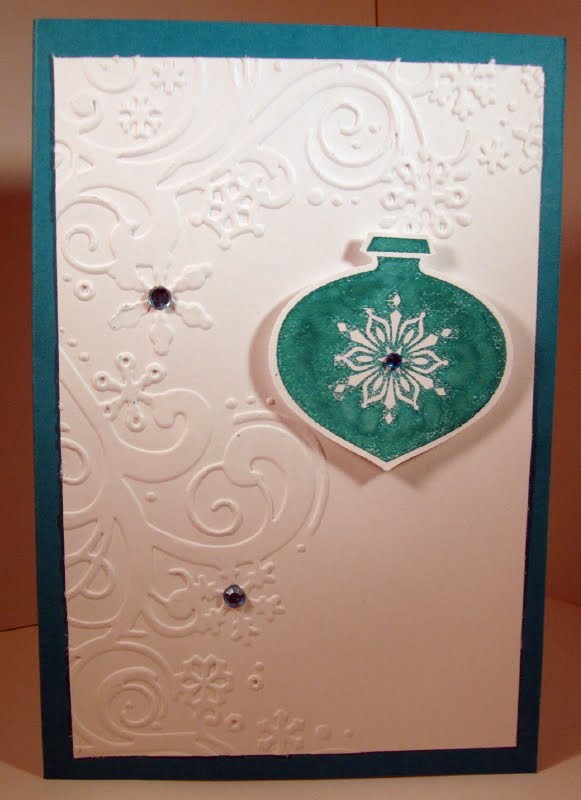
The last card used another Cuttlebug embossing folder. Using the Stampin' Up! ornament stamps and punch, I put the ornaments on dimensionals. A brad at the top of the ornament and a punched snowflake finished the front.


The envelopes for each card are stamped with a matching stamp from the card.

Tuesday, September 28, 2010

Birthday King For A Day


My grandson's 6th birthday is tomorrow. I received the ribbon from my sister; she said it was to stretch my card making skills. I used red sticky tape to adhere the three lengths of ribbon to the front (and inside) of the card. I used the Cuttlebug embossing folders King for a Day and Dotted Swiss.

The inside of the card is a cat colored to look just like his cat.

Sunday, September 12, 2010

Birthday Happy


My son's birthday is this week and he really likes the brayered sunset cards. So, of course, I had to make him one!

I used photography paper again, which is somewhat difficult because it is so glossy. I have found slow, firm pressure in one direction allows the ink to spread out smoothly. The colors in the picture are not as rich as in the actual card.

Sunday, August 29, 2010

3D Hearts


Experimenting with my heart punch and stamps, I stamped and punched three hearts out. Then I scored all three hearts through the center. I taped heart 1 to heart 2. Then I taped heart 2 to heart 3. Which created a 3D heart. The cards were fun to make.


Sponges and Brayers

The Thinking of You card was done on more mustard card stock with a brayer. I used brown, maroon, yellow, and orange inks. The brayer did not spread the ink; instead the ink soaked into the card stock immediately. I liked the randomness of the design, so I just stamped the tree and the sentiment in brown ink. I used Stampin' Up's Thoughts and Prayers stamp set.


The Living With Passion Card was done on photo paper, so I used sponges with the brown, orange, and yellow inks. The photo paper allows me to blend much easier because the ink takes quite a while to dry. However, the sponges take longer than a brayer. I used Stampin' Up's Inspired by Nature stamp set.


Both cards were attached to dark brown card stock. I really like both cards, even though they were done completely differently.